I've finished painting my 15mm dwarf army! The below photo shows it arrayed as units for a Dragon Rampant warband. The infantry are all Alternative Armies and the mounted figures are from Battle Valor Games.
I think dwarves don't need any fantastical rules to make them feel right on the battlefield. Here's my list for a 24 point DR warband.
Axemen and Hammerers : Heavy Foot x 4 (4 points each, one with the Leader trait)
As you can see above, one unit includes the dwarf king and counts as the Leader unit for the warband.
Crossbows : Heavy Missiles (4 points)
Bear-riders : Heavy Riders (4 points)
I've got another unit of bear-riders painted up that can be swapped in as either a hero or alternate leader. For a heroic unit, I'd classify them as Elite Riders with the Level-headed trait (8 points) and drop one Heavy Foot unit. Or just add them in for a 32 point game. 🙂
So it's a six unit warband and the use of all heavy units makes it a slow, but hard-hitting force. Just as dwarves ought to be.
As you may have noticed, they are based on group bases. These are sized for Hordes of the Things. I can easily put together a couple of 24 point HotT armies from what I've got here:
Dwarf Army I
Blade General (dwarf king) @ 2 AP x 1
Blades (dwarfs with axes and hammers) @ 2 AP x 9
Shooters (dwarfs with crossbows) @ 2 AP x 2
Dwarf Army II
Hero General (dwarf champion on bear) @ 4 AP x 1
Knights (dwarf bear-riders) @ 2 AP x 4
Blades (dwarfs with axes and hammers) @ 2 AP x 4
Shooters (dwarfs with crossbows) @ 2 AP x 2
Showing posts with label 15mm. Show all posts
Saturday, December 14, 2019
Wednesday, August 29, 2012
Tyranian Star Empire Shock Troops
The Tyranian system was one of the first colonies founded by the Great Diaspora from Old Earth to discover hyperspace travel. They used their technological advantage to dominate nearby star systems, quickly developing an intergalactic empire. On subject worlds, Imperial Shock Troops are garrisoned to discourage notions of rebellion.
IMPERIAL
SHOCK TROOPS PLATOON
Troop
Quality: D8-D10
Morale:
D8-D10
Confidence
Level: Confident to High
Supply
Quality Level: Normal to
Abundant
Overall
Tech Level: 2
On
Grid? Yes
Body
Armor: TL2, Hard (2D)
TYPICAL
UNIT ATTRIBUTES
- Forward Observer
- Terminal Air Controller
- Medic
- Despised
SPECIAL
GEAR DESCRIPTIONS
Laser
Combat Rifle (LCR): A compact, maintenance-free energy weapon powered with high-efficiency batteries.
X-10 Missile
Launcher: A small-tubed launcher that trades accuracy for range; can be equipped for both anti-armor and anti-personnel roles.
Laser Support Weapon (LSW): An upscaled version of the LCR with a sustained fire mode for armor penetration and a rapid blast mode for suppression fire.
IMPERIAL
SHOCK TROOPS PLATOON
Imperial
Shock Troops Fireteam
1x Team Leader w/LCR
1x Trooper w/X-10 Missile Launcher
(Med. ABW AP:2/AT:2 (M)
1x Trooper w/LSW
(Med. LWS AP:2/AT:2 (M)
1x Trooper w/LCR
Imperial
Shock Troops Squad
1x Squad Leader w/LCR
2x Shock Troops Fireteams
Imperial
Shock Troops Platoon HQ Squad
1x Platoon Leader w/LCR
1x Platoon Sgt. w/LCR
1x Medic w/LCR
1x Grid Specialist w/LCR
1x Trooper w/LCR
Imperial
Shock Troops Platoon
1x Imperial Shock Troops Platoon HQ
Squad
3x Imperial Shock Troops Squads
These figures are from Irregular Miniatures 15mm Sci-Fi Star Marines range.
Wednesday, June 13, 2012
Kimeran Defense Forces
The colony planet of Kimera is notable for having successfully freed themselves from the rule of the Tyranian Star Empire. The outbreak of interstellar war between the Empire and the Independent Systems Alliance proved to be the opportune moment for the Kimerans to launch their rebellion. The bulk of the Kimeran Defense Force ground troops that fought in that conflict were rifle platoons organized along the following lines.
KIMERAN
DEFENSE FORCE RIFLE PLATOON
Troop
Quality: D8-D10
Morale:
D8-D10
Confidence
Level: Confident to High
Supply
Quality Level: Normal to
Abundant
Overall
Tech Level: 2
On
Grid? No
Body
Armor: TL2, Hard (2D)
TYPICAL
UNIT ATTRIBUTES
- Forward Observer
- Terminal Air Controller
- Medic
SPECIAL
GEAR DESCRIPTIONS
PA3
Advanced Combat Rifle: The
standard assault rifle of the Kimeran Defense Force.
PA17
Squad Automatic Weapon: (Lt. AP:1)
Uses the same caliber ammo as the PA3, but in large assault pack
magazines.
Multi-role
RPG: (Med. AP:2/AT:2(M)
With its flexible armament, this grenade launcher support weapon is adaptable to either an
anti-personnel or anti-vehicle role.
PA45 Sniper Rifle (Med.
AP:2/AT:1 (L) A heavy sniper rifle capable of firing light armor-piercing explosive rounds.
KDF RIFLE PLATOON
KDF
Rifle Fireteam
1x Team Leader w/PA3 ACR
1x Grenadier w/MRPG (Med. AP:2/AT:2
(M)
1x Gunner w/PA17 SAW (Lt. AP:1)
2x Rifleman w/PA3 ACR
KDF
Rifle Squad
1x Squad Leader w/PA3 ACR
2x KDF Rifle Fireteams
KDF
Rifle Platoon HQ Squad
1x Platoon Leader w/PA3 ACR
1x Platoon Sgt. w/PA3 ACR
1x Medic w/PA3 ACR
1x Sniper w/PA45 Sniper Rifle (Med.
AP:2/AT:1 (L)
1x Spotter w/PA3 ACR
KDF
Rifle Platoon
1x KDF Rifle Platoon HQ Squad
Tuesday, June 12, 2012
Contracting Trouble
A squad of US Army figures from Rebel Minis recently made their way onto my painting table, so that meant I had appropriate figures for the Contracting Trouble scenario from the Force on Force rulebook. I was able to play this scenario twice, once from each side, with a friend a few days ago. Here's a shot of my US Army squad:
I set up the board for the scenario. I didn't have any hot spot markers made, so I just used piles of little stones in the number corresponding to the number of the hot spot to mark their positions. My buildings tend to be bigger than those shown in the maps in the book, but I can usually get a pretty similar set up, making sure I have the same relative open areas and blocking terrain. Here is an overview of my board for Contracting Trouble:
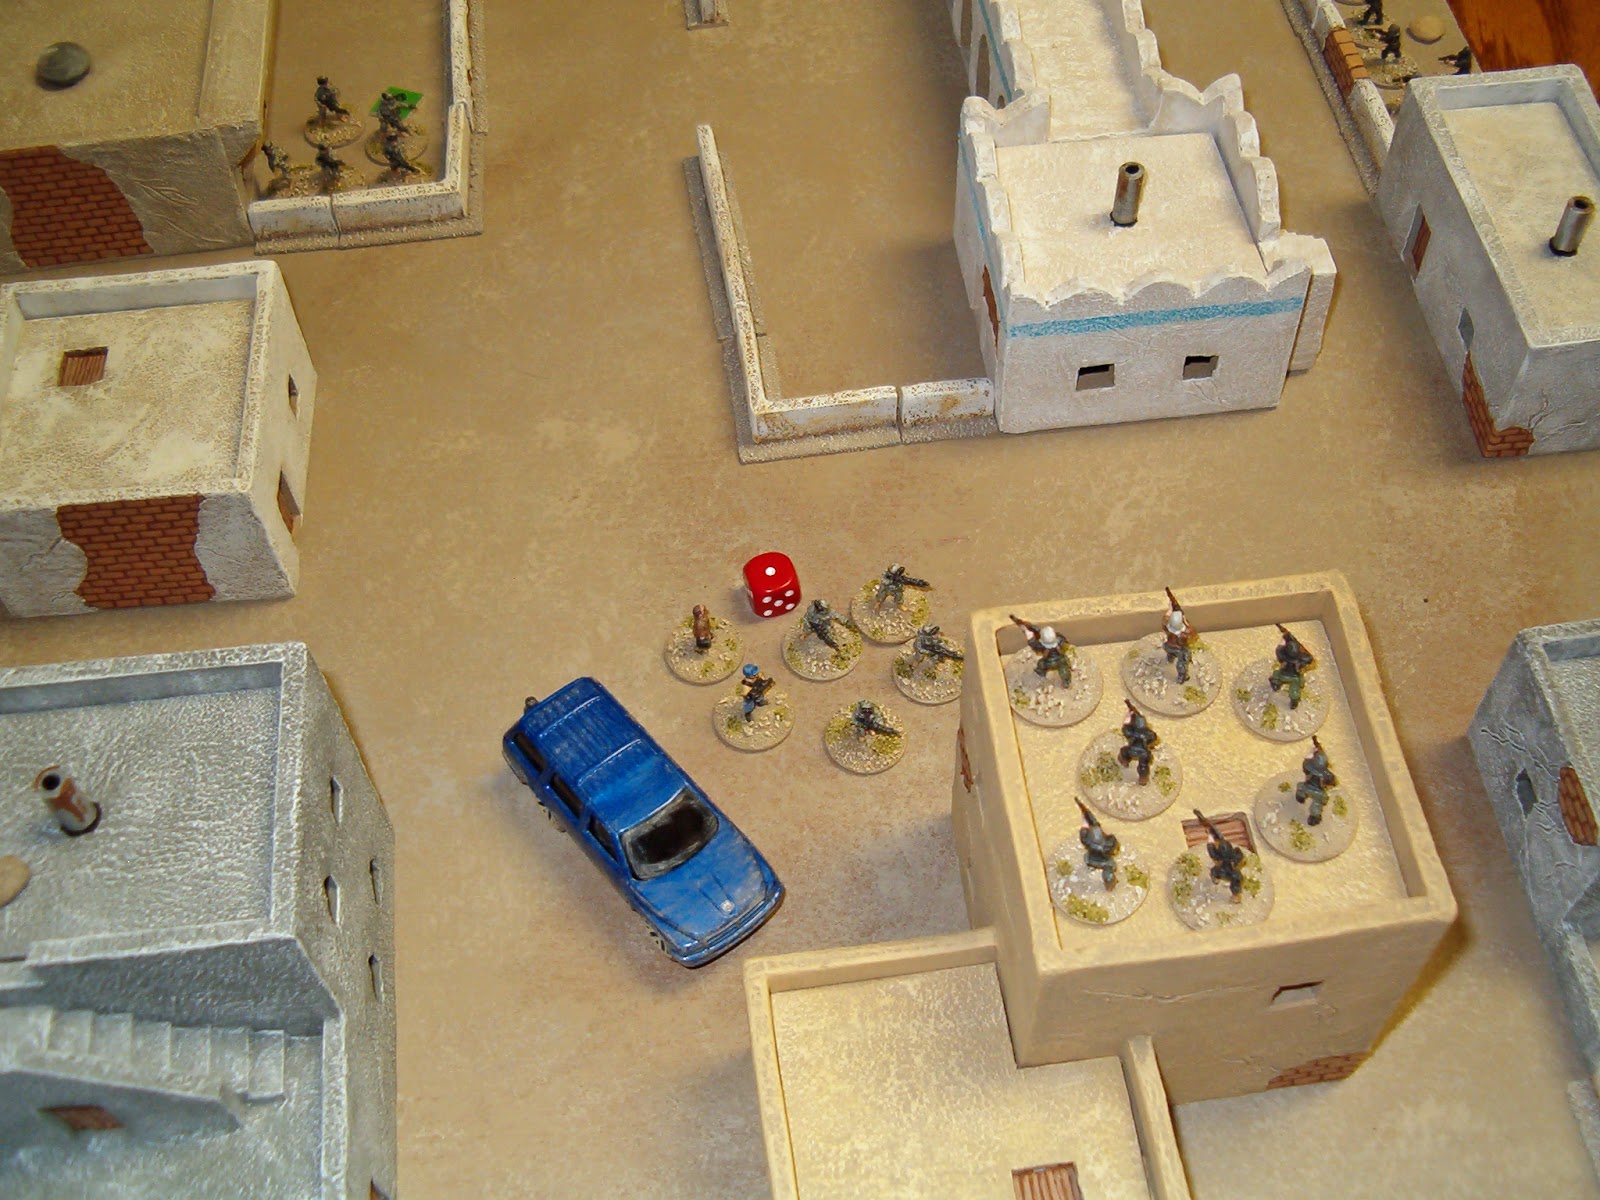
And a close up of the contractors that need rescuing, taking cover next to their wrecked SUV:
I was playing the insurgents. I could not catch a break with the reaction tests; it seemed every time the regulars failed a test, so did the insurgents. My opponent had one squad make a rapid move up to the corner of a stone wall, close to the center of the board and took out both RPG-wielding figures in hot spots 3 & 5. Here they are at the end of their move:
Then the other squad made a rapid move to the the walled area on the other side of the street. They took fire from the insurgents at hot spot 1, but took out one of them with no hits in return. When they moved into the line of sight of the insurgents at hot spot 4, they again won the reaction test for the round of fire and wiped them out. Here they are in their final position:
With the firepower of that squad dwindling, I thought maybe I could sneak a leader out of the alley towards the insurgent group at hot spot 1, but they mowed him down anyway. Then I tried to send one to hot spot 2 and he was taken out by the other squad. Enough of that! I rolled for reinforcements and got 2 insurgents with small arms (no leader) added to hot spot 1 and 5 insurgents with small arms added to hot spot 2. Here is how things stood at the end of the first turn, note how the left side of the board is now completely empty of insurgents:
My opponent starts turn two by putting one of his squads on overwatch, then the US squad closest to the SUV starts the second turn by making a rapid move to pick up the contractors and start heading towards the west edge of the board down the street. My two insurgent groups were out of line of sight, so no reactions were made to this move.
My first non-initiative unit action is to move the insurgent group into the building from hot spot 2 and then firing on the squad with the contractors. The overwatch unit shoots and I choose not to return fire, so they can fire at their original target. My group takes 2 casualties and passes their morale test. They then lose the reaction test to their main target, who also inflict two casualties. The insurgents pass their morale test again, but whittled down to 3 figures, only inflict one casualty on the US squad.
My other insurgent unit can only see the US squad that was placed on overwatch, so they fire at them. The regulars lose a reaction test for the first time! But I can't manage any casualties and the US squad inflicts 3 kills on the insurgent group with their return fire.
I roll for reinforcements and get 4 figures at hot spot 2 and 3 figures at hot spot 1. Here is how things look at the end of turn two:
At the start of turn three, my opponent rolls his first aid check and the soldier is dead. The squad passes their morale test and can act normally. He places the other squad on overwatch again. The US squad goes to move off the west board edge with the contractors for their first action. I react with fire from the building near hot spot 2, take fire from the overwatch squad and lose 3 figures. I decide to return fire on the overwatch squad, hoping to keep them from firing at my other unit later. I inflict one casualty, but they pass their morale test. As the US squad continues its move towards the board edge, they become visible to the insurgent group at hot spot 1 down a narrow alley. The overwatch squad loses the reaction test, so that fire will occur last. The insurgents lose the reaction test with the other squad and take two casualties, then return fire without getting any hits. Here they are about to leave the board:
So the contractors are rescued. The insurgents lose a couple more figures to fire from the overwatch squad's fire. Reinforcements are rolled and a small group appears at hot spot 2, behind the building where they can't see the US squad left on the table. The first aid check shows that the casualty is dead. The US squad passes its morale test and can act normally. My opponent orders the squad to move off the south board edge. I react with fire from the group at hot spot 1, but fail to inflict any casualties and they easily escape.
The final victory totals are 15 points for the US army and 4 for the insurgents, so a decisive victory for the US player. I think we both made pretty good decisions in the game, but I had the misfortune of only winning a couple of reaction tests the whole game and my opponent had both his casualties result in death, which ironically is a better outcome than seriously wounded, as long as they pass the resulting morale test. A serious wound means the unit may only react to fire for the next turn, which would have slowed him down and allowed time for me to get more reinforcements and take more shots at him.
We reset the board and switched sides for a second play. Things were going even better for me than they had for my friend as the US player. I got the contractors off-board during turn four with no casualties suffered on my side. At the end of that turn, my friend rolled a large group of reinforcements for hot spot 1, the group ended up being 11 figures. When my remaining squad went to leave the board, they were engaged by a round of fire from that large group of insurgents. I won the reaction test, but only caused a couple casualties. The return fire, with the maximum of ten dice (they had an RPG and an RPK), wiped out my unit completely! We assumed with the other squad gone that the insurgents could easily capture them, so we didn't play any further and just rolled a first aid test for the captured unit. The result was two dead and two POWs. That made the final score 14 points for the insurgents and just 10 for the US side. An indecisive result according to the scenario victory table, thought nearly a marginal victory for the insurgents.
So in the end, I was unable to taste the sweet nectar of victory playing either side, but I had a great time. I'm looking forward to getting more of my US army figures painted and playing more scenarios.
Thursday, May 24, 2012
Sci Fi Buildings in 15mm
I've been gearing up for some Tomorrow's War action and I needed to make some 15mm buildings for sci fi games. I'd seen some other folks do buildings using electrical boxes and I thought that looked like a good idea. So a took a trip to the lumber yard and for a little under $10 I had the start of six buildings. I glued on some shapes cut from styrene, mat board, cereal box card stock and a few other bits from my recycled junk box. You can see the results in the picture below, just before I primed them for painting.
The seventh, black building in the picture above was a frozen entree container I had saved quite a few years ago with just such a future project in mind. After priming I painted them with acrylic craft paints and sealed them with a clear matte spray varnish. I was pretty pleased with the results.
I wrote up a scenario that would use these buildings and the figures I currently have painted, based loosely on one of the scenarios from the rulebook. More about that in a future post...
Saturday, June 25, 2011
My latest miniature gaming obsession was sparked by picking up a copy of the new Force on Force rulebook from Ambush Alley Games. I'm most interested in playing modern asymmetrical games, so I've been busy making buildings for a middle eastern town. Here are a couple pictures of my buildings set up on a 2' x 2' board (for 15mm scale).
I picked up the "Operation Darkstar" campaign battle box from Rebel Minis, and the layout shown above is based on the first scenario from that set. The buildings are all made from foamcore and have detachable roofs for placing figures inside.
After assembling the buildings, I drew areas onto the foamcore where I intended to show exposed bricks, then covered the rest of the wall surfaces with spackling, to give give them that stucco look.
With this done, it was time to paint up the minis. The battle box from Rebel Minis comes with 13 special forces figures, to represent Task Force Black, 24 terrorists, and 1 hostage. Here is a picture of the three fire teams that make up Task Force Black.
I wanted my Task Force Black minis to look like they were in multicam. I tried several variations; it was hard to simplify it down to give the right impression in 15mm. But I'm relatively pleased with the results. Here's a close-up of one of the four-man fire teams.
And here is a close-up shot of the five-man assault team armed with SMGs and combat shotguns.

The terrorists are organized into six-man cells. All my minis are based on 3/4" steel washers for magnetic storage.
Here's a close-up of the hostage, who appears to be in big trouble.
My terrorist figures have a color-coding with their hoods, an idea I got from the forums on the Ambush Alley Games site. The leaders have very light gray hoods and the support weapon guys have red hoods. Makes them easy to pick out of the crowd.
I plan to post battle reports for the "Operation Darkstar" scenarios as we play them. So be on the look out for that.
Monday, January 31, 2011
Neil Thomas inspired rules for the AWI
I have long been interested in gaming battles of the American War for Independence, and I came across a set of variant rules based on Neil Thomas' "Napoleonic Wargaming" rules. There are actually a few such variants floating around the interwebs; the set I like best was written by Brian Cowan and posted the the Neil Thomas Yahoo group.
The first few playtests have gone quite well. The rules seem to capture enough of the flavor of the period without getting bogged down in details, which is what originally drew me to Neil's rules. The only house rules I'm using at this time involve morale rolls, where units that fail continue to roll until they pass or run out of stands, and the artillery rules. The standard rules call for an artillery unit to be immune from charges by enemies when within 8cm of a friendly unit. This has led to some very irregular situations on the battlefield. So at this time I'm experimenting with a rule to require an infantry unit to attach to an artillery unit to protect it.
I thought it would be fun to post a detailed battle report with pictures. First, I'll give the army lists used for the battle.
Continental Army List:
4x Continental Regulars (Infantry, Average)
2x State Militia (Infantry, Levy)
1x Dragoons (Cavalry, Average)
1x Artillery (Light, Average)

British Army List:
4x Line Infantry (Infantry, Average)
1x Grenadiers (Infantry, Elite)
1x Light Infantry (Infantry, Average)
1x Dragoons (Cavalry, Elite)
1x Artillery (Light, Average)

As you can see the lists share several units of similar quality, but the Continentals get inferior militia units while the British get versatile light infantry and elite grenadiers. To offset this clear advantage somewhat, the Continentals will be put in the role of the defender in the scenario and the militia will have a sturdy stone wall to line up behind. The playing area is 36" square and the Continentals will be allowed to set up anywhere on their half of the board. The British army will approach their position, starting within 6" of their board edge.
The next post will show the initial deployment of forces and the opening turns of the game.
Subscribe to:
Posts (Atom)