Saturday, December 14, 2019

Dwarf Army

I've finished painting my 15mm dwarf army! The below photo shows it arrayed as units for a Dragon Rampant warband.  The infantry are all Alternative Armies and the mounted figures are from Battle Valor Games.


I think dwarves don't need any fantastical rules to make them feel right on the battlefield.  Here's my list for a 24 point DR warband.

Axemen and Hammerers : Heavy Foot x 4 (4 points each, one with the Leader trait)


As you can see above, one unit includes the dwarf king and counts as the Leader unit for the warband.

Crossbows : Heavy Missiles (4 points)


Bear-riders : Heavy Riders (4 points)


I've got another unit of bear-riders painted up that can be swapped in as either a hero or alternate leader.  For a heroic unit, I'd classify them as Elite Riders with the Level-headed trait (8 points) and drop one Heavy Foot unit.  Or just add them in for a 32 point game. 🙂


So it's a six unit warband and the use of all heavy units makes it a slow, but hard-hitting force.  Just as dwarves ought to be.

As you may have noticed, they are based on group bases.  These are sized for Hordes of the Things.  I can easily put together a couple of 24 point HotT armies from what I've got here:

Dwarf Army I

Blade General (dwarf king) @ 2 AP x 1
Blades (dwarfs with axes and hammers) @ 2 AP x 9
Shooters (dwarfs with crossbows) @ 2 AP x 2

Dwarf Army II

Hero General (dwarf champion on bear) @ 4 AP x 1
Knights (dwarf bear-riders) @ 2 AP x 4
Blades (dwarfs with axes and hammers) @ 2 AP x 4
Shooters (dwarfs with crossbows) @ 2 AP x 2

Saturday, August 24, 2019

Projects

This blog has been dormant for a while now, as I had not been doing much miniature gaming (in favor of more board gaming) and out of sheer laziness.  But I recently read a blog post where the author laid out his current and planned projects, and it has inspired me to do likewise.  If for no other reason than it can help me plan how I spend my hobby time.  Plus, I can use it as impetus to add posts about these projects.

CURRENT PROJECTS

Battlelore
Last year I decided to paint up the miniatures in the Battlelore 2nd Edition board game.  I started with the Uthuk Y'llan faction, and I have made good progress.  I'll try to get some pictures in a blog post of what I've finished so far.  I picked up the models for the Undead faction, so this is a project that will be ongoing for some time.

Undead army
About 10 years ago, I purchased some 28mm scale skeletons from Mega Miniatures and a necromancer from Reaper Miniatures, with the intention of creating an undead warband for use with fantasy skirmish rules.  And never got around to painting them.  However, I began playing Dragon Rampant recently and it's inspired me to paint these models up for a DR warband.  I bought a box of the Warlord Games plastic skeletons to add to the mix, and a few other bits.  This is a project I expect to complete in the next month or so.

Dwarf army
Another pile of lead I picked up years ago and didn't paint.  These are from Alternative Armies, bought along with Elf models that I actually did paint and base for Hordes of the Things (HotT) at the time.  Since I've found that my group-based 15mm HotT armies work perfectly well for Dragon Rampant, I'm looking at double duty for all of my 15mm fantasy stuff going forward.  Or maybe triple duty, as I have a friend that likes to use Hail Caesar for fantasy in 15mm.  I believe I can finish the models I currently own for this in the next month or so.  Though I'm considering buying some bear-riding cavalry from Battle Valor Games, just to give them a little variety, as all the stuff I have now gives me an army with just crossbows and heavy infantry.

Star Wars Legion
Over the last year I've completed 800 points worth of both Imperial and Rebel models, so I could play a standard-size game.  I've continued to purchase more as they are released and will be painting additional units for the foreseeable future.

You might wonder why I'm juggling four projects, rather than focusing on one at a time.  The simple answer is that I find I get more done this way.  When I've tried to force myself to stick to one project at a time, I'll get a bit bored at times and stop working all together for a while.  The variety of things to work on encourages me to do more than I otherwise would. 

PLANNED PROJECTS

Wood Elves
After the 28mm Undead army is finished, this is next on my list.  I picked up a Reaper Minis dryad and bought some small tree men (I believe they call them "saprolings") to be her retinue.  I also got Reaper's "Spirit of the Forest," which is essentially a large tree man.  I very much like his dynamic pose.  Although I'm thinking I may do a bit of conversion work to make him taller.  For the actual Wood Elf figures, I'm considering a box or two of the new Oathmark plastic Elves.  I like the aesthetics of their Elf figures, not being over-elaborate in their dress or weapons.

Hive Creatures
This is a project that was started years ago and abandoned.  I bought a box of GW's Tyranid Hormagaunts and some Reaper Minis "Hooked Terrors" which matched their look, as perhaps leader-type figures.  They were intended to be insectoid xenomorphs for scifi skirmish games.  I painted up one sprue and one metal mini, then lost the impetus to finish them.  But I think they would also make an interesting all-melee force for Dragon Rampant, so I'm newly motivated to get them painted.

Alexandrian Macedonians
Quite a few years back, I had some gaming friends that floated the idea of playing Neil Thomas's Ancient & Medieval Wargaming rules in 15mm.  So I went out and bought a bunch of Old Glory 15mm Macedonians, enough for 13 units (6 x phalangites, 2 x companion cavalry, 2 x peltasts, 2 x light cavalry, 1 x hypaspists), but this notion never went anywhere.  But between the fun I've had recently playing a friend's Hail Caesar game and the other compatible rule sets I've got for ancient wargaming, I want to do this army and some opponents.  There is a nice variety of units to paint from this period.

Lizardmen
I've always wanted to have a Lizardmen army for 15mm fantasy gaming.  I'm rather liking the Battle Valor Games stuff and I think they would paint up pretty quickly.  I haven't purchased anything yet, but this is likely to happen sooner than later.


Friday, January 31, 2014

Firespray Repaint for X-Wing

I got a second Firespray model as a gift last Christmas, so it was necessary to give this one an alternate paint job.  I liked the color scheme on the Krassis Trelix card, so that is the basis of my repaint.  Here are a few photos, including the stock Slave I model for comparison.


Friday, October 19, 2012

X-Wings Among the Asteroids

So after playing Fantasy Flight's new Star Wars X-Wing game with a friend's miniatures a bunch, my stuff finally arrived and I got to take them for a spin.  My sons graciously allowed me to play the Rebel side for a change and we decided to try out Mission #2: Asteroid Run.  Here is a rundown of the fleet builds, each totaling 100 points:

Rebel Force
  1. X-Wing - Wedge Antilles (29)
    • R5 Astromech (1)
    • Swarm Tactics (2) 
  2. X-Wing - Rookie Pilot (21)
  3. X-Wing - Rookie Pilot (21) 
  4. Y-Wing - Gray Squadron Pilot (20)
    • R2 Astromech (1)
    • Ion Cannon (5)

Imperial Force
  1. TIE Advanced - Darth Vader (29)
    • Marksmanship (3)
    • Concussion Missiles (4)
  2. TIE Fighter - Black Squadron Pilot (14)
    • Determination (1)
  3. TIE Advanced - Tempest Squadron Pilot (21)
    • Concussion Missiles (4)
  4. TIE Fighter - Academy Pilot (12)
  5. TIE Fighter - Academy Pilot (12)
In this mission, one of your ships is carrying important intelligence, but has been damaged and can only move distances of 1 or 2 for the first four turns of the game.  To win, the Rebels must keep the damaged ship alive and get it off the one of the Imperial board edges after the start of turn 5.  I chose my Y-Wing for this role as it can absorb three more hits than an X-Wing.

The Imperials chose to split their forces with Lord Vader and the Black Squadron Pilot on one edge, the Tempest Squadron Pilot and the two Academy Pilots on the opposite.  I set up my Y-Wing to head towards one of the Academy Pilots and aimed my X-Wing squadron at the other two Imperial ships on that side.

My plan was to (hopefully) take out a couple of the Imperial ships in the early rounds which, though they would come back as Academy Pilots with the reinforcement rules, would give a bit of respite to my Y-Wing.  This did not work out at all.  I lined up some good combined fire on the TIEs on turn 1, but nearly all my hits were blocked.  I did catch a break on turn 2, when the TIE Fighter that had passed by my Y-Wing tried a Koiogran Turn that ended slightly off the board edge.  However, I failed to make good guesses as to where the TIEs were moving and ended up with two ships without targets to shoot at on turn 2.  Here's the position at the end of turn 2:

You can see above two of my X-Wings were out of position, while the Imperial ships were zeroing in on their objective.  On turn 3 the Y-Wing found itself in the crossfire of both TIE Advanced ships and the newly arrived TIE Fighter reinforcement.  The Y-Wing was blown apart and the Imperials took the victory.   Below is a photo of the final position:


While the Imperials certainly had some luck on turn 1 with the dice and I maneuvered poorly in turn 2, I think the biggest mistake I made was in my force composition.  I really underestimated how hard it was going to be for my Y-Wing to stand up to the Imperial onslaught.  I need pilots that will help me more defensively.  To that end, I have devised a new force composition to try out.

Rebel Force Redux
  1. X-Wing - Biggs Darklighter (28)
    • R5-D8 (3)
  2. X-Wing - Garven Dreis (26)
  3. X-Wing - Rookie Pilot (21)
  4. Y-Wing - Gray Squadron Pilot (20)
    • R2-D2 (4)
I dropped the Ion Cannon for R2-D2 who can help the Y-Wing regenerate shield points.  Biggs Darlighter's special ability is to force enemies to target him instead of other ships within range 1 of him, so he'll fly in close formation with the Y-Wing for added protection.  Biggs will be flying with R5-D8 who can help him repair hits.  Finally, I'll take Garven Dreis who can give a spent Focus token to any friendly ship within range 2.  That can also be used to add to the Y-Wing's defenses.

Hopefully I'll get a chance soon to see if I can redeem the Rebel's reputation.  Or at least keep my Y-Wing alive a couple more turns...


Wednesday, August 29, 2012

Tyranian Star Empire Shock Troops

The Tyranian system was one of the first colonies founded by the Great Diaspora from Old Earth to discover hyperspace travel.  They used their technological advantage to dominate nearby star systems, quickly developing an intergalactic empire.  On subject worlds, Imperial Shock Troops are garrisoned to discourage notions of rebellion.

IMPERIAL SHOCK TROOPS PLATOON
Troop Quality: D8-D10
Morale: D8-D10
Confidence Level: Confident to High
Supply Quality Level: Normal to Abundant
Overall Tech Level: 2
On Grid? Yes
Body Armor: TL2, Hard (2D)

TYPICAL UNIT ATTRIBUTES
  • Forward Observer
  • Terminal Air Controller
  • Medic
  • Despised

SPECIAL GEAR DESCRIPTIONS
Laser Combat Rifle (LCR): A compact, maintenance-free energy weapon powered with high-efficiency batteries.
X-10 Missile Launcher: A small-tubed launcher that trades accuracy for range; can be equipped for both anti-armor and anti-personnel roles.
Laser Support Weapon (LSW): An upscaled version of the LCR with a sustained fire mode for armor penetration and a rapid blast mode for suppression fire.

IMPERIAL SHOCK TROOPS PLATOON

Imperial Shock Troops Fireteam
1x Team Leader w/LCR
1x Trooper w/X-10 Missile Launcher
(Med. ABW AP:2/AT:2 (M)
1x Trooper w/LSW
(Med. LWS AP:2/AT:2 (M)
1x Trooper w/LCR

Imperial Shock Troops Squad
1x Squad Leader w/LCR
2x Shock Troops Fireteams

Imperial Shock Troops Platoon HQ Squad
1x Platoon Leader w/LCR
1x Platoon Sgt. w/LCR
1x Medic w/LCR
1x Grid Specialist w/LCR
1x Trooper w/LCR


Imperial Shock Troops Platoon
1x Imperial Shock Troops Platoon HQ Squad
3x Imperial Shock Troops Squads 

These figures are from Irregular Miniatures 15mm Sci-Fi Star Marines range.


Wednesday, June 13, 2012

Kimeran Defense Forces

The colony planet of Kimera is notable for having successfully freed themselves from the rule of the Tyranian Star Empire.  The outbreak of interstellar war between the Empire and the Independent Systems Alliance proved to be the opportune moment for the Kimerans to launch their rebellion.  The bulk of the Kimeran Defense Force ground troops that fought in that conflict were rifle platoons organized along the following lines.

KIMERAN DEFENSE FORCE RIFLE PLATOON
Troop Quality: D8-D10
Morale: D8-D10
Confidence Level: Confident to High
Supply Quality Level: Normal to Abundant
Overall Tech Level: 2
On Grid? No
Body Armor: TL2, Hard (2D)

TYPICAL UNIT ATTRIBUTES
  • Forward Observer
  • Terminal Air Controller
  • Medic
SPECIAL GEAR DESCRIPTIONS
PA3 Advanced Combat Rifle: The standard assault rifle of the Kimeran Defense Force.
PA17 Squad Automatic Weapon: (Lt. AP:1) Uses the same caliber ammo as the PA3, but in large assault pack magazines.
Multi-role RPG: (Med. AP:2/AT:2(M) With its flexible armament, this grenade launcher support weapon is adaptable to either an anti-personnel or anti-vehicle role.
PA45 Sniper Rifle (Med. AP:2/AT:1 (L)  A heavy sniper rifle capable of firing light armor-piercing explosive rounds.
 
KDF RIFLE PLATOON

KDF Rifle Fireteam
1x Team Leader w/PA3 ACR
1x Grenadier w/MRPG (Med. AP:2/AT:2 (M)
1x Gunner w/PA17 SAW (Lt. AP:1)
2x Rifleman w/PA3 ACR


KDF Rifle Squad
1x Squad Leader w/PA3 ACR
2x KDF Rifle Fireteams


KDF Rifle Platoon HQ Squad
1x Platoon Leader w/PA3 ACR
1x Platoon Sgt. w/PA3 ACR
1x Medic w/PA3 ACR
1x Sniper w/PA45 Sniper Rifle (Med. AP:2/AT:1 (L)
1x Spotter w/PA3 ACR


KDF Rifle Platoon
1x KDF Rifle Platoon HQ Squad
3x KDF Rifle Squads 

These 15mm miniatures are from the now-defunct Force XXI Miniatures line.

Tuesday, June 12, 2012

Contracting Trouble

A squad of US Army figures from Rebel Minis recently made their way onto my painting table, so that meant I had appropriate figures for the Contracting Trouble scenario from the Force on Force rulebook.  I was able to play this scenario twice, once from each side, with a friend a few days ago.  Here's a shot of my US Army squad:

I set up the board for the scenario.  I didn't have any hot spot markers made, so I just used piles of little stones in the number corresponding to the number of the hot spot to mark their positions.  My buildings tend to be bigger than those shown in the maps in the book, but I can usually get a pretty similar set up, making sure I have the same relative open areas and blocking terrain.  Here is an overview of my board for Contracting Trouble:

And a close up of the contractors that need rescuing, taking cover next to their wrecked SUV:

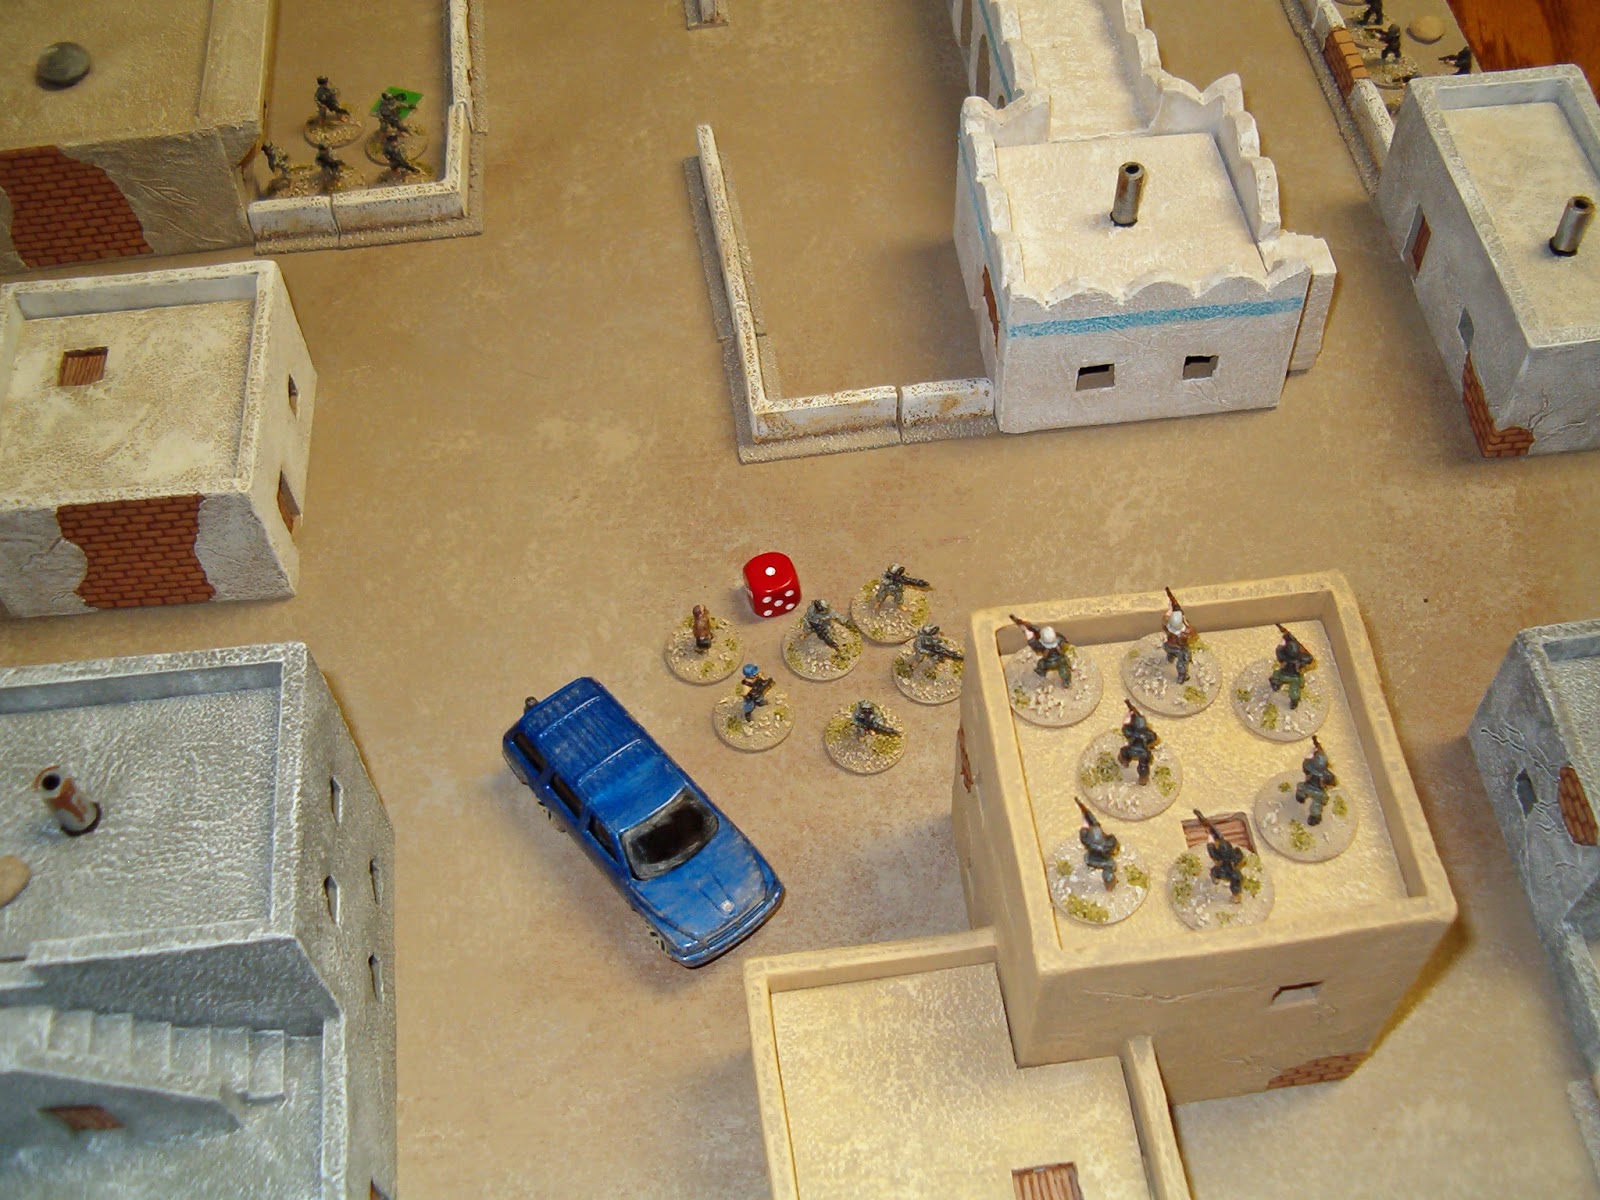
I was playing the insurgents.  I could not catch a break with the reaction tests; it seemed every time the regulars failed a test, so did the insurgents.  My opponent had one squad make a rapid move up to the corner of a stone wall, close to the center of the board and took out both RPG-wielding figures in hot spots 3 & 5.  Here they are at the end of their move:

Then the other squad made a rapid move to the the walled area on the other side of the street.  They took fire from the insurgents at hot spot 1, but took out one of them with no hits in return.  When they moved into the line of sight of the insurgents at hot spot 4, they again won the reaction test for the round of fire and wiped them out.  Here they are in their final position:

With the firepower of that squad dwindling, I thought maybe I could sneak a leader out of the alley towards the insurgent group at hot spot 1, but they mowed him down anyway.  Then I tried to send one to hot spot 2 and he was taken out by the other squad.  Enough of that!  I rolled for reinforcements and got 2 insurgents with small arms (no leader) added to hot spot 1 and 5 insurgents with small arms added to hot spot 2.  Here is how things stood at the end of the first turn, note how the left side of the board is now completely empty of insurgents:

My opponent starts turn two by putting one of his squads on overwatch, then the US squad closest to the SUV starts the second turn by making a rapid move to pick up the contractors and start heading towards the west edge of the board down the street.  My two insurgent groups were out of line of sight, so no reactions were made to this move.

My first non-initiative unit action is to move the insurgent group into the building from hot spot 2 and then firing on the squad with the contractors.  The overwatch unit shoots and I choose not to return fire, so they can fire at their original target.  My group takes 2 casualties and passes their morale test.  They then lose the reaction test to their main target, who also inflict two casualties.  The insurgents pass their morale test again, but whittled down to 3 figures, only inflict one casualty on the US squad.

My other insurgent unit can only see the US squad that was placed on overwatch, so they fire at them.  The regulars lose a reaction test for the first time!  But I can't manage any casualties and the US squad inflicts 3 kills on the insurgent group with their return fire.

I roll for reinforcements and get 4 figures at hot spot 2 and 3 figures at hot spot 1.   Here is how things look at the end of turn two:

At the start of turn three, my opponent rolls his first aid check and the soldier is dead.  The squad passes their morale test and can act normally.  He places the other squad on overwatch again.  The US squad goes to move off the west board edge with the contractors for their first action.  I react with fire from the building near hot spot 2, take fire from the overwatch squad and lose 3 figures.  I decide to return fire on the overwatch squad, hoping to keep them from firing at my other unit later.  I inflict one casualty, but they pass their morale test.  As the US squad continues its move towards the board edge, they become visible to the insurgent group at hot spot 1 down a narrow alley.  The overwatch squad loses the reaction test, so that fire will occur last.  The insurgents lose the reaction test with the other squad and take two casualties, then return fire without getting any hits.  Here they are about to leave the board:

So the contractors are rescued.  The insurgents lose a couple more figures to fire from the overwatch squad's fire.  Reinforcements are rolled and a small group appears at hot spot 2, behind the building where they can't see the US squad left on the table.  The first aid check shows that the casualty is dead.  The US squad passes its morale test and can act normally.  My opponent orders the squad to move off the south board edge.  I react with fire from the group at hot spot 1, but fail to inflict any casualties and they easily escape.

The final victory totals are 15 points for the US army and 4 for the insurgents, so a decisive victory for the US player.  I think we both made pretty good decisions in the game, but I had the misfortune of only winning a couple of reaction tests the whole game and my opponent had both his casualties result in death, which ironically is a better outcome than seriously wounded, as long as they pass the resulting morale test.  A serious wound means the unit may only react to fire for the next turn, which would have slowed him down and allowed time for me to get more reinforcements and take more shots at him.

We reset the board and switched sides for a second play.  Things were going even better for me than they had for my friend as the US player.  I got the contractors off-board during turn four with no casualties suffered on my side.  At the end of that turn, my friend rolled a large group of reinforcements for hot spot 1, the group ended up being 11 figures.  When my remaining squad went to leave the board, they were engaged by a round of fire from that large group of insurgents.  I won the reaction test, but only caused a couple casualties.  The return fire, with the maximum of ten dice (they had an RPG and an RPK), wiped out my unit completely!  We assumed with the other squad gone that the insurgents could easily capture them, so we didn't play any further and just rolled a first aid test for the captured unit.  The result was two dead and two POWs.  That made the final score 14 points for the insurgents and just 10 for the US side.  An indecisive result according to the scenario victory table, thought nearly a marginal victory for the insurgents.

So in the end, I was unable to taste the sweet nectar of victory playing either side, but I had a great time.  I'm looking forward to getting more of my US army figures painted and playing more scenarios.